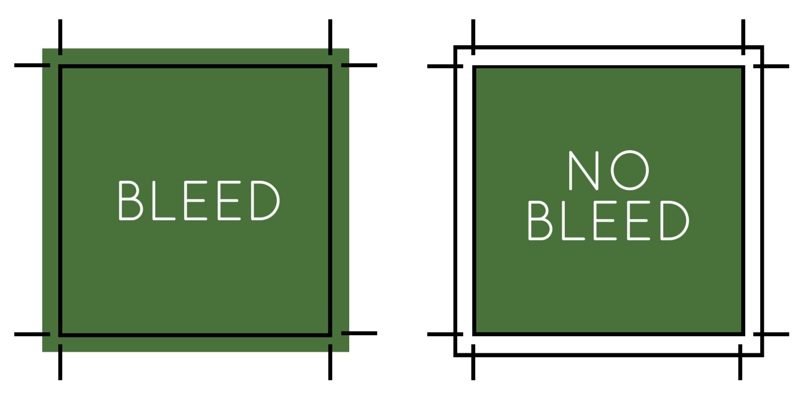
Thursday, April 30, 2020

Release to Layers Sequence


  • By selecting the drop-down in layers panel, select "release layers to sequence to put each path in separate layer
  • this works especially well for importing ai files in after effects

Wednesday, April 29, 2020

Preparing Illlustrator files for After Effects

In Illustrator - Preparation
  • Place all vector paths in the layers that they are meant to be placed in. i.e. sections/groups of vectors. ex: when illustrating a person's face, one part of the face you might have are the eyes as a separate layer


  • By selecting the drop-down in layers panel, select "release layers to sequence to put each path in separate layer
  • this works especially well for importing ai files in after effects

In After Effects - Importing


1. 


2. 


3. 

  • When importing ai file into after effects, we are going to select FILE>IMPORT FILE
  • We are going to make sure it is a "composition - Retain File Sizes"; not "footage". This ensures that all layers from .ai file will automatically get cropped at the edges, making it easier to edit each individual component


After Effects blog post:

https://www.blogger.com/blogger.g?blogID=6361797571478875406#editor/target=post;postID=6218440806600586042;onPublishedMenu=allposts;onClosedMenu=allposts;postNum=3;src=postname

Thursday, April 23, 2020

Global Edit

global_edit_options_button


  • Select > Start Global Edit
  • Select "Appearance" to find objects with the same appearance
  • Start Global Edit is in the Quick Actions panel

SOURCE:
https://helpx.adobe.com/illustrator/using/global-edit.html

Sunday, April 12, 2020

Illustrator - Study Guide

https://design.tutsplus.com/articles/the-a-to-z-of-adobe-illustrator--vector-20799


tutplus guide to illustrator acting as this kind of glossary of terms for everything. very helpful.

Pathfinder Options


Two overlapping shapes
Original
Two shapes combined using the Unite pathfinder mode
Unite
Two shapes combined using the Minus Front pathfinder mode
Minus Front
Two shapes combined using the Intersect pathfinder mode
Intersect
Two shapes combined using the Exclude pathfinder mode
Exclude


SOURCE:
https://sts.doit.wisc.edu/manuals/illustrator1/

Bleed, Slug, Spine and Margin


  • Bleed
  • the space beyond where the print will be trimmed.
Image Source:
https://blog.thepapermillstore.com/bleed-what-is-it-why-need-it/
  • Slug
  • the part of a URL which identifies a particular page on a website in an easy to read form.
  • Spine
  • a layout in which a main aisle is used for the movements between the work cells located on both side and for the temporary storage of work in process.
SOURCE:
https://www.quora.com/How-do-I-create-a-book-cover-spine-in-Adobe-InDesign-It-needs-to-be-between-1-4-and-1-2-inch-I-also-need-to-know-how-to-add-the-books-title-and-my-name-as-author-to-the-spine-so-it-reads-sideways-when-the-book-is-lying-flat
  • Margin
  •  the part of a page or sheet outside the main body of print or writing

SOURCE:
https://graphicdesign.stackexchange.com/questions/46606/applying-different-margins-slugs-to-different-pages


SOURCES:
https://www.merriam-webster.com/dictionary/margin

https://www.researchgate.net/publication/233350411_Spine_layout_design

https://yoast.com/slug/

Illustrator Brushes

5 brushes


  • Calligraphic brushes
    • Create strokes that resemble those drawn with the angled point of a calligraphic pen and are drawn along the center of the path. When you use the Blob Brush tool, you can paint with a calligraphic brush and automatically expand the brush stroke into a fill shape that merges with other filled objects of the same color that intersect or are adjacent in stacking order.
    • Scatter brushes

    • Disperse copies of an object (such as a ladybug or a leaf) along the path.

    • Art brushes
    • Stretch a brush shape (such as Rough Charcoal) or object shape evenly along the length of the path.
    • Bristle brush

    • Create brush strokes with the appearance of a natural brush with bristles.
    • Pattern brushes

    • Paint a pattern—made of individual tiles—that repeats along the path. Pattern brushes can include up to five tiles, for the sides, inner corner, outer corner, beginning, and end of the pattern.


    Source:
    https://helpx.adobe.com/illustrator/using/brushes.html

    Interface


    • control panel is at the very top of interface shows the color, stroke, and pattern properties
    • document window is the workspace with a bar at the top that you can undock by clicking and dragging
    • tools panel on the left shows the tools
    • status bar is at the bottom of the interface.
    • panels dock on the right of interface consists of properties to apply to strokes, fills and gradients
    • in the center of interface is the artboard

    See the source image
    Image Source:
    https://sts.doit.wisc.edu/manuals/illustrator1/