Software: Illustrator
#wolfmanart
Twitter:
@WolfmanArtist
Showing posts with label illustrator. Show all posts
Saturday, January 11, 2020
Saturday, November 9, 2019
Problems (11/09/2019)
Increasing and Decreasing Concentric and Radial Dividers on the Polar Grid Tool
-I've been learning how to integrate this in my work flow but, I can seem to figure out how to increase and decrease dividers upon after scaling the polar grid. A tutorial showed me that the arrow keys were suppose to increase and decrease them but, It didn't work on my computer.
Can't Find Swatches in Swatches Panel
-Select all swatches from a folder by clicking the first and shift+clicking the last swatch. On the drop down menu on the right of the panel select "Add to Swatches". The Swatches are now added to your swatches panel.
Transforming (scale, rotate, etc.) the Graph
-Object > Ungroup
-Objects can now be transformed in groups.
-Data no longer editable
-Another option is to use the scale tool to transform the entire graph while still retaining the option to edit it's data.
-I've been learning how to integrate this in my work flow but, I can seem to figure out how to increase and decrease dividers upon after scaling the polar grid. A tutorial showed me that the arrow keys were suppose to increase and decrease them but, It didn't work on my computer.
Can't Find Swatches in Swatches Panel
-Select all swatches from a folder by clicking the first and shift+clicking the last swatch. On the drop down menu on the right of the panel select "Add to Swatches". The Swatches are now added to your swatches panel.
Transforming (scale, rotate, etc.) the Graph
-Object > Ungroup
-Objects can now be transformed in groups.
-Data no longer editable
-Another option is to use the scale tool to transform the entire graph while still retaining the option to edit it's data.
UI Icons - Study Guide
Location:
C:\Users\Will.000\Desktop\Illustrator - Tutorials\UI Icons - Study
Isolate Selected Object
Draw Normal
Draw Behind
Draw Inside
C:\Users\Will.000\Desktop\Illustrator - Tutorials\UI Icons - Study
Isolate Selected Object
Draw Normal
Draw Behind
Draw Inside
Friday, November 1, 2019
What are Ligatures?
Ligatures are typographic replacement characters for certain letter pairs. Most fonts include ligatures for standard letter pairs such as fi, fl, ff, ffi, and ffl.
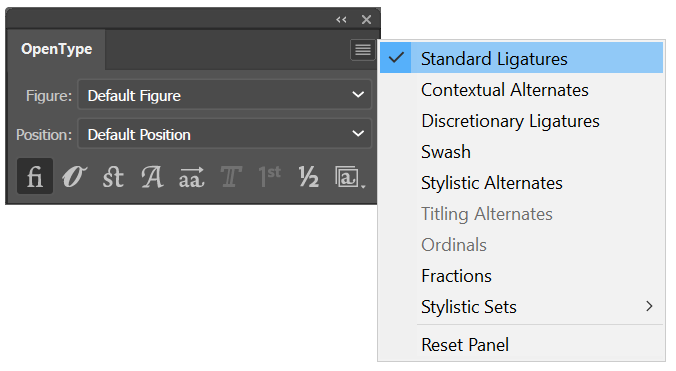
Image Source:
https://helpx.adobe.com/illustrator/using/arabic-hebrew.html

Image Source:
https://www.typenetwork.com/news/article/opentype-at-work-contextual-alternates
"Ligatures and contextual alternates basically serve the same purpose: they offer solutions for problematic or unwieldy glyph sequences. Although their name implies that they connect two or more glyphs, some ligatures actually solve problems by shortening letter parts, exactly like some contextual alternates do. So why are they two distinct features? The fundamental difference between them is that ligatures replace two or more glyphs with one combined glyph, while contextual alternates only change the appearance of one glyph at a time. A ligature typically resolves one single awkward glyph combination; a contextual alternate can offer solutions for many different graceless scenarios."
*contextual alternates only change two or more glyphs at a time.
*ligatures replace two or more glyphs with one combined glyph
What is a glyph?
A Glyph is a stylic set that can be applied to a group of characters.
SOURCE:
https://helpx.adobe.com/illustrator/using/special-characters.html

Image Source:
https://helpx.adobe.com/illustrator/using/arabic-hebrew.html
Image Source:
https://www.typenetwork.com/news/article/opentype-at-work-contextual-alternates
"Ligatures and contextual alternates basically serve the same purpose: they offer solutions for problematic or unwieldy glyph sequences. Although their name implies that they connect two or more glyphs, some ligatures actually solve problems by shortening letter parts, exactly like some contextual alternates do. So why are they two distinct features? The fundamental difference between them is that ligatures replace two or more glyphs with one combined glyph, while contextual alternates only change the appearance of one glyph at a time. A ligature typically resolves one single awkward glyph combination; a contextual alternate can offer solutions for many different graceless scenarios."
*contextual alternates only change two or more glyphs at a time.
*ligatures replace two or more glyphs with one combined glyph
What is a glyph?
A Glyph is a stylic set that can be applied to a group of characters.
SOURCE:
https://helpx.adobe.com/illustrator/using/special-characters.html
Sunday, October 27, 2019
Properties Panel
The Properties panel in Illustrator lets you view settings and controls in the context of your current task or workflow. This panel has been designed with ease of use in mind, ensuring that you have access to the right controls when you need them.
SOURCE:
https://helpx.adobe.com/illustrator/using/properties-panel.html
SOURCE:
https://helpx.adobe.com/illustrator/using/properties-panel.html
Flash Catalyst
FXG - document profile
FXG is a graphics file format based on a subset of MXML, the XML-based programming language used by the Flex framework.
You can use FXG files in applications such as Adobe Flash Builder/Adobe Flash Catalyst to develop rich Internet applications and experiences.
SOURCE:
https://helpx.adobe.com/illustrator/using/fxg-format-cs5-5-cs6.html
FXG is a graphics file format based on a subset of MXML, the XML-based programming language used by the Flex framework.
You can use FXG files in applications such as Adobe Flash Builder/Adobe Flash Catalyst to develop rich Internet applications and experiences.
SOURCE:
https://helpx.adobe.com/illustrator/using/fxg-format-cs5-5-cs6.html
RGB Colors - Additive Colors
RGB colors are called additive colors because you create white by adding R, G, and B together—that is, all light is reflected back to the eye. Additive colors are used for lighting, television, and computer monitors. Your monitor, for example, creates color by emitting light through red, green, and blue phosphors.
SOURCE:
https://helpx.adobe.com/illustrator/using/color.html
SOURCE:
https://helpx.adobe.com/illustrator/using/color.html
Saturday, October 26, 2019
Use actions to automate tasks in Illustrator
-an action is a series of tasks that you play back on a single file or a batch of files—menu commands, panel options, tool actions, and so on. For example, you can create an action that changes the size of an image, applies an effect to the image, and then saves the file in the desired format.
-you can’t record commands in the Effects and View menus, commands that display or hide panels, and use of the Selection, Pen, Paintbrush, Pencil, Gradient, Mesh, Eyedropper, Live Paint Bucket, and Scissors tools.
Default Resolutions for Each Profile
Print
width: 612 pt
height: 792 pt
Web
width: 960 px
height: 560 px
Devices
i.e. iPad
width: 768 px
height: 1024 px
Video and Film
i.e. NTSC widescreen
width: 873 px
height: 480 px
Basic RGB
width: 960 pt
height: 560 pt
Flash Builder
width: 800 px
height: 600 px
width: 612 pt
height: 792 pt
Web
width: 960 px
height: 560 px
Devices
i.e. iPad
width: 768 px
height: 1024 px
Video and Film
i.e. NTSC widescreen
width: 873 px
height: 480 px
Basic RGB
width: 960 pt
height: 560 pt
Flash Builder
width: 800 px
height: 600 px
Brush Panel - Illustrator
Illustrator has 5 kinds of brushes:
calligraphic, scatter, art, pattern, and bristle.

SOURCE:
https://helpx.adobe.com/illustrator/using/brushes.html
calligraphic, scatter, art, pattern, and bristle.

SOURCE:
https://helpx.adobe.com/illustrator/using/brushes.html
Friday, October 25, 2019
Exercise (10/25/2019)
Isometric Grid
show rules
create guide.
alt > arrow-right. repeat at least 20 times.
transform all guides by rotating at 120 degrees. then, "copy"
transform all guides again. then, "copy"
that is the isometric grid.
create guide.
alt > arrow-right. repeat at least 20 times.
transform all guides by rotating at 120 degrees. then, "copy"
transform all guides again. then, "copy"
that is the isometric grid.
Slicing
https://www.youtube.com/watch?v=3Z8RpG3v3so
-slices segments individually
-saving each in document
Thursday, October 24, 2019
9-slice scaling
https://creativepro.com/understanding-illustrator-s-9-slice-scaling/
essential for web graphics
9-slice scaling is useful only when applied to symbols that will be viewed with the Flash Player (as SWF).
Since it’s an effect applied in the Flash Player, you won’t be able to preview the result of a 9-slice scale unless you’re viewing your art in the Flash Player.
1. f8 - define a symbol
2. Enable Guides for 9-slice scaling. The symbol must be defined as a Movie Clip (Figure 1).
you can preview the proper 9-slice scale result by checking Enable Live Preview from the Control menu.

4 guides create 9 different regions on the screen
middle - both horizontally and vertically
upper left, upper right, lower left, lower right are all areas that do not scale at all.
SOURCE:
https://creativepro.com/understanding-illustrator-s-9-slice-scaling/
essential for web graphics
9-slice scaling is useful only when applied to symbols that will be viewed with the Flash Player (as SWF).
Since it’s an effect applied in the Flash Player, you won’t be able to preview the result of a 9-slice scale unless you’re viewing your art in the Flash Player.
1. f8 - define a symbol
2. Enable Guides for 9-slice scaling. The symbol must be defined as a Movie Clip (Figure 1).
you can preview the proper 9-slice scale result by checking Enable Live Preview from the Control menu.

4 guides create 9 different regions on the screen
middle - both horizontally and vertically
upper left, upper right, lower left, lower right are all areas that do not scale at all.
SOURCE:
https://creativepro.com/understanding-illustrator-s-9-slice-scaling/
Wednesday, October 23, 2019
Navigating in Panels - Exercise
-you can dock and stack panel windows
-panels are used modifying, viewing, and changing layers on artboards.
Layer
list of layers
Artboard
list of artboards
Swatch
list of swatches
Tools
list of tools
Symbols
list of symbols
-panels are used modifying, viewing, and changing layers on artboards.
Layer
list of layers
Artboard
list of artboards
Swatch
list of swatches
Tools
list of tools
Symbols
list of symbols
Save Selection Feature - Saves Time
Save Selection put the skill on a different level because marquee-selecting in illustrator, and then, shift+clicking object to combine the selection as a whole can take up loads of time. This save selection feature saves the day for your new professional workflow. This is something that I was looking for in Illustrator for a long time but couldn't find it. This will make it easier to prioritize certain tasks when working on freelance projects.
Blend - Color Spectrum
Blend Tool - Color Spectrum
Select two colors distant from each other.
go to "Blend" and then, select Blend Options to customize the distance of squares.
How Offset Paths Work
Miter Limit:
“The miter limit controls when the program switches from a mitered (pointed) join to a beveled (squared-off) join. The default miter limit is 10, which means that when the length of the point reaches ten times the stroke weight, the program switches from a miter join to a bevel join. A miter limit of 1 results in a bevel join.”
SOURCE:
https://design.tutsplus.com/tutorials/comparing-the-two-methods-for-creating-line-icons-offset-paths-vs-strokes--cms-25134
Tuesday, October 22, 2019
Subscribe to:
Posts (Atom)


