Software: Illustrator
#wolfmanart
Twitter:
@WolfmanArtist
Showing posts with label ai. Show all posts
Showing posts with label ai. Show all posts
Saturday, January 11, 2020
Saturday, November 9, 2019
Problems (11/09/2019)
Increasing and Decreasing Concentric and Radial Dividers on the Polar Grid Tool
-I've been learning how to integrate this in my work flow but, I can seem to figure out how to increase and decrease dividers upon after scaling the polar grid. A tutorial showed me that the arrow keys were suppose to increase and decrease them but, It didn't work on my computer.
Can't Find Swatches in Swatches Panel
-Select all swatches from a folder by clicking the first and shift+clicking the last swatch. On the drop down menu on the right of the panel select "Add to Swatches". The Swatches are now added to your swatches panel.
Transforming (scale, rotate, etc.) the Graph
-Object > Ungroup
-Objects can now be transformed in groups.
-Data no longer editable
-Another option is to use the scale tool to transform the entire graph while still retaining the option to edit it's data.
Friday, November 1, 2019
What are contextual alternates?
Contextual alternates are alternate characters included in some script typefaces to provide better joining behavior. For example, when using Caflisch Script Pro with contextual alternates enabled, the letter pair “bl” in the word “bloom” is joined so that it looks more like handwriting.

Image Source:
https://www.typenetwork.com/news/article/opentype-at-work-contextual-alternates
Source:
https://helpx.adobe.com/illustrator/using/arabic-hebrew.html

Image Source:
https://www.typenetwork.com/news/article/opentype-at-work-contextual-alternates
Source:
https://helpx.adobe.com/illustrator/using/arabic-hebrew.html
What are Ligatures?
Ligatures are typographic replacement characters for certain letter pairs. Most fonts include ligatures for standard letter pairs such as fi, fl, ff, ffi, and ffl.

Image Source:
https://helpx.adobe.com/illustrator/using/arabic-hebrew.html

Image Source:
https://www.typenetwork.com/news/article/opentype-at-work-contextual-alternates
"Ligatures and contextual alternates basically serve the same purpose: they offer solutions for problematic or unwieldy glyph sequences. Although their name implies that they connect two or more glyphs, some ligatures actually solve problems by shortening letter parts, exactly like some contextual alternates do. So why are they two distinct features? The fundamental difference between them is that ligatures replace two or more glyphs with one combined glyph, while contextual alternates only change the appearance of one glyph at a time. A ligature typically resolves one single awkward glyph combination; a contextual alternate can offer solutions for many different graceless scenarios."
*contextual alternates only change two or more glyphs at a time.
*ligatures replace two or more glyphs with one combined glyph
What is a glyph?
A Glyph is a stylic set that can be applied to a group of characters.
SOURCE:
https://helpx.adobe.com/illustrator/using/special-characters.html

Image Source:
https://helpx.adobe.com/illustrator/using/arabic-hebrew.html
Image Source:
https://www.typenetwork.com/news/article/opentype-at-work-contextual-alternates
"Ligatures and contextual alternates basically serve the same purpose: they offer solutions for problematic or unwieldy glyph sequences. Although their name implies that they connect two or more glyphs, some ligatures actually solve problems by shortening letter parts, exactly like some contextual alternates do. So why are they two distinct features? The fundamental difference between them is that ligatures replace two or more glyphs with one combined glyph, while contextual alternates only change the appearance of one glyph at a time. A ligature typically resolves one single awkward glyph combination; a contextual alternate can offer solutions for many different graceless scenarios."
*contextual alternates only change two or more glyphs at a time.
*ligatures replace two or more glyphs with one combined glyph
What is a glyph?
A Glyph is a stylic set that can be applied to a group of characters.
SOURCE:
https://helpx.adobe.com/illustrator/using/special-characters.html
Illustrator - 1,000 artboards
Currently 100 but will soon allow 1,000 artboards.
SOURCE:
https://www.digitaltrends.com/photography/adobe-illustrator-artboards-limit-1000/
SOURCE:
https://www.digitaltrends.com/photography/adobe-illustrator-artboards-limit-1000/
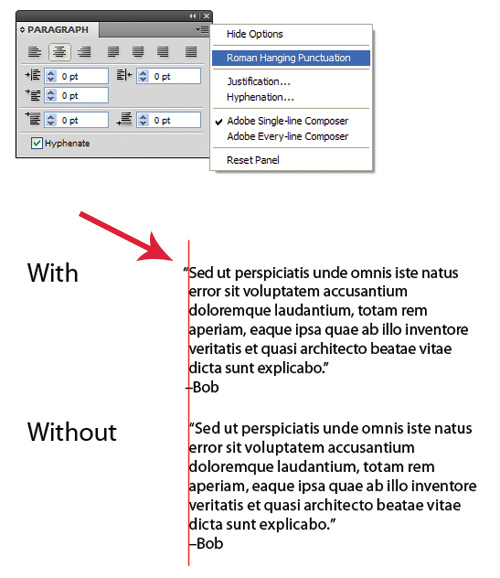
Roman Hanging Punctuation
Roman hanging punctuation will give your blocks of text a clean appearance. By turning on the Roman hanging option in Illustrator, it will make the text line up evenly by “hanging” quotation marks in the margin. Otherwise, quotations are set flush with text, within the margin.
To turn on Roman hanging punctuation, open the Paragraph tool panel, and click on the arrow on the upper right of the box. A drop-down menu will appear in which you can choose “Roman Hanging Punctuation.”

Image Source:
https://justcreative.com/wp-content/uploads/2010/02/roman-hanging.jpg
SOURCE:
https://www.smashingmagazine.com/2011/02/useful-typography-tips-for-adobe-illustrator/
To turn on Roman hanging punctuation, open the Paragraph tool panel, and click on the arrow on the upper right of the box. A drop-down menu will appear in which you can choose “Roman Hanging Punctuation.”

Image Source:
https://justcreative.com/wp-content/uploads/2010/02/roman-hanging.jpg
SOURCE:
https://www.smashingmagazine.com/2011/02/useful-typography-tips-for-adobe-illustrator/
Monday, October 28, 2019
3D Logo - Practice
Created a 3D logo in Illustrator using 3D effects and gradient fills for the background.
notes:
-Graphic styles aren't talked about too much online with Illustrator. Love the functionality it brings in editing pre-defined strokes. and fills. Dynamic for quick solutions in getting something 3-dimensional.
Sunday, October 27, 2019
Properties Panel
The Properties panel in Illustrator lets you view settings and controls in the context of your current task or workflow. This panel has been designed with ease of use in mind, ensuring that you have access to the right controls when you need them.
SOURCE:
https://helpx.adobe.com/illustrator/using/properties-panel.html
SOURCE:
https://helpx.adobe.com/illustrator/using/properties-panel.html
Selection Options
There are an incredible amount of ways in selecting your objects inside illustrator. I think it is essential for everyone to wrap their heads around each one so, that they can develop a routine in knowing which one works better for a particular task at any given moment while on the job. These are the definitions for each one. For me, the save selection option is still my favorite since, it is really convenient to name selections when scenes get really complex. Unlike Photoshop, Illustrator's layers panel is sort of click-sensitive in my opinion. It's going to be a lot easier and more professional when finding alternative selection methods in order to speed up the workflow and so that clients are the given the results promptly.
Flashcards:
https://www.cram.com/flashcards/memorize/illustrator-selections-11043582
Isolation Mode
Lets you quickly isolate a layer, sublayer, path, or group of objects, from all other art in your document. When in isolation mode, all nonisolated objects in the document appear dimmed and are not selectable or editable.
Layers Panel
Lets you quickly and precisely select individual or multiple objects. You can select a single object (even if it’s in a group), all objects within a layer, and entire groups.
Selection tool
Lets you select objects and groups by clicking or dragging over them. You can also select groups within groups and objects within groups.
Direct Selection tool
Lets you select individual anchor points or path segments by clicking on them, or select an entire path or group by selecting any other spot on the item. You can also select one or more objects in a group of objects.note: When in outline mode, the Direct Selection tool may select imported graphics that are near the tool’s pointer. To avoid selecting unwanted graphics, lock or hide the graphics before making the selection.
Group Selection tool
Lets you select an object within a group, a single group within multiple groups, or a set of groups within the artwork. Each additional click adds all objects from the next group in the hierarchy.
Perspective Selection tool
Lets you bring objects and text in perspective, switch active planes, move objects in perspective, and move objects in perpendicular direction.
Lasso tool
Lets you select objects, anchor points, or path segments by dragging around all or part of the object.
Magic Wand tool
Lets you select objects of the same color, stroke weight, stroke color, opacity, or blending mode by clicking the object.
Live Paint Selection tool
Lets you select faces (areas enclosed by paths) and edges (portions of paths between intersections) of Live Paint groups.
Selection commands
(located in the Select menu) Let you quickly select or deselect all objects, and select objects based on their position relative to other objects. You can select all objects of a specific type or that share specific attributes, and save or load selections. You can also select all objects in the active artboard.
Save Selection
Allows you to save a selection of objects by naming the selection, and returning to it upon after clicking select > [name].
SOURCE:
https://helpx.adobe.com/illustrator/using/selecting-objects.html
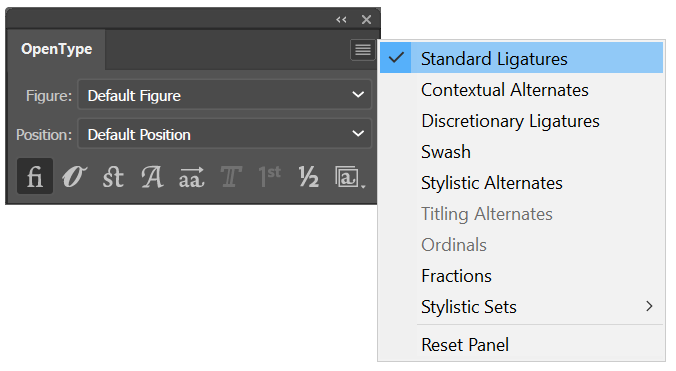
OpenType Fonts
OpenType fonts use a single font file for both Windows® and Macintosh® computers, so you can move files from one platform to another without worrying about font substitution and other problems that cause text to reflow.
Ligatures - Text
Ligatures are typographic replacement characters for certain letter pairs.
Contextual alternates are alternate characters included in some script typefaces to provide better joining behavior.
A stylistic set is a group of glyph alternates that can be applied to a selected block of text.
Window > Type > OpenType to open the OpenType panel. Now, do one of the following:
Click the Stylistic Sets icon () at the bottom of the panel and choose the desired set.
Select Stylistic Sets from the panel menu and choose the desired set.
SOURCE:
https://helpx.adobe.com/illustrator/using/special-characters.html#use_ligatures_and_contextual_alternates
Simplify object to reduce anchor points while retaining the shape
Object > Path > Simplify.

SOURCE:
https://helpx.adobe.com/illustrator/using/editing-paths.html
Good analogy: adjusting subdivision levels for polygons in a mesh when 3d modelling an object in ZBrush. This instead is 2D and the simplify option helps organizes line segments by offering less to work with.

SOURCE:
https://helpx.adobe.com/illustrator/using/editing-paths.html
Good analogy: adjusting subdivision levels for polygons in a mesh when 3d modelling an object in ZBrush. This instead is 2D and the simplify option helps organizes line segments by offering less to work with.
Graphs in Illustrator
Bar Graph
Stacked Bar Graph
Column Graph
Stacked Column Graph
Pie Graph
Radar Graph
Area Graph
Line Graph
Scatter Graph
Hotkeys for graph data:
A Entry text box Enter the data
B Import data Import data saved as a text file
C Transpose row/column
Switch the columns and rows of data
D Switch x/y
Switch the x and u axes of graphs
E Cell style
Adjust the column width or decimal precision of cells
F Revert Revert the changes you've made in the graph data
G Apply Apply the changes you've made in the graph data
Bridging between Excel and Illustrator:

Copying data from a spreadsheet in excel and pasting into the top left corner of the data table in Illustrator
SOURCE:
https://helpx.adobe.com/illustrator/using/graphs.html
Stacked Bar Graph
Column Graph
Stacked Column Graph
Pie Graph
Radar Graph
Area Graph
Line Graph
Scatter Graph
Hotkeys for graph data:
A Entry text box Enter the data
B Import data Import data saved as a text file
C Transpose row/column
Switch the columns and rows of data
D Switch x/y
Switch the x and u axes of graphs
E Cell style
Adjust the column width or decimal precision of cells
F Revert Revert the changes you've made in the graph data
G Apply Apply the changes you've made in the graph data
Bridging between Excel and Illustrator:

Bar Graphs in Illustrator. Enter numbers to form size of bars in each column.
SOURCE:
https://helpx.adobe.com/illustrator/using/graphs.html
Symbol Sprayer
The Symbol Sprayer acts like a particle sprayer—letting you add a large number of identical objects to the artboard at one time. For example, use the symbol sprayer to add hundreds of grass blades, wildflowers, bees, or snowflakes.
Good Analogy: CC particular in After Effects. Particle system generator that allows user to easily generate particles while adding unique effects for an animation.
SOURCE:
https://helpx.adobe.com/illustrator/using/symbolism-tools-symbol-sets.html
Good Analogy: CC particular in After Effects. Particle system generator that allows user to easily generate particles while adding unique effects for an animation.
Symbol Spinner
Click or drag over the symbol instances you want to stain with the colorization color. The amount of colorization gradually increases, and the symbol instance’s color gradually changes to the colorization color.
Hold down Alt (Windows) or Option (Mac OS) as you click or drag to decrease the colorization amount and reveal more of the original symbol color.
Hold down Shift as you click or drag to keep the colorization amount constant, while gradually changing the color of the symbol instances to the colorization color.
Symbol Shifter
-Changes stacking order of symbol instances in a set
To move symbol instances, drag in the direction you want the symbol instances to move.
To bring symbol instances forward, Shift-click the symbol instance.
To send symbol instances backward, hold down Alt (Windows) or Option (Mac OS) and Shift-click the symbol instance.
SOURCE:
https://helpx.adobe.com/illustrator/using/symbolism-tools-symbol-sets.html
Symbol Styler
The Symbol Styler tool lets you apply or remove a graphic style from a symbol instance. You can control the amount and location of the application. For example, you can apply a style gradually so that some symbol instances display the style at full strength and others display the style at partial strength.
SOURCE:
https://helpx.adobe.com/illustrator/using/symbolism-tools-symbol-sets.html
SOURCE:
https://helpx.adobe.com/illustrator/using/symbolism-tools-symbol-sets.html
Labels:
2dart,
2ddesign,
2dgraphics,
2dvector,
3deffects,
9scale slicing,
actions,
additivecolors,
adobeconnect,
adobeglossary,
adobeillustrator,
adobeprograms,
adobesoftware,
ai,
symbolstyler,
tool
Symbol Scruncher
Click or drag in the area where you want to pull the symbol instances toward each other. Opposite to this is click+alt+drag and it will reversibly push outward. Sort of works similar to the bloat and pluck tool in how it pulls inward and pushes outward.
Hold down Alt (Windows) or Option (Mac OS), and click or drag in the area where you want to push symbol instances away from each other.
Hold down Alt (Windows) or Option (Mac OS), and click or drag in the area where you want to push symbol instances away from each other.
Symbol Stainer Tool
Click or drag over the symbol instances you want to stain with the colorization color. ...
A symbol set is a group of symbol instances that you create with the Symbol Sprayer tool. You can create mixed sets of symbol instances by using the Symbol Sprayer tool with one symbol and then using it again with another symbol.
Staining a symbol instance changes the hue toward the tint color, while preserving the original luminosity. (It works in the same way as the Tints and Shades colorization method of tinting brushes.)
SOURCE:
https://helpx.adobe.com/illustrator/using/symbolism-tools-symbol-sets.html
Symbol Screener
-Click or drag where you want to increase the symbol’s transparency.
Hold down Alt (Windows) or Option (Mac OS), and click or drag where you want to decrease the symbol’s transparency.
SOURCE:
https://helpx.adobe.com/illustrator/using/symbolism-tools-symbol-sets.html
Hold down Alt (Windows) or Option (Mac OS), and click or drag where you want to decrease the symbol’s transparency.
SOURCE:
https://helpx.adobe.com/illustrator/using/symbolism-tools-symbol-sets.html
Subscribe to:
Posts (Atom)


